Mr S
Administrator  I am the overlord tank
Posts: 36
Gamer Tag: Lucky-Jase
|
Post by Mr S on Mar 16, 2016 10:32:07 GMT 9.5
Hi all! I aim to keep everyone interested in the club this year, with a variety of tasks planned to keep you challenged. I want to get a 3D modelling competition started this week, and will provide more details on Friday. In the mean time, I have provided a few links below if you wanted to get a head start on learning a free program called Blender. Focus at the moment on modelling, with texturing and exporting coming later. Download Blenderwww.blender.org/download/Blender.org tutorialswww.blender.org/support/tutorials/Blender Guru tutorialswww.blenderguru.com/tutorial-category/modeling-tutorials |
|
Mr S
Administrator
I am the overlord tank
Posts: 36
Gamer Tag: Lucky-Jase
|
Post by Mr S on Mar 20, 2016 16:07:52 GMT 9.5
If you have found the dimensions of a lego figure, found some good tutorials, or got any tips for others, post HERE!
|
|
|
|
Post by Jack Stevens on Mar 21, 2016 7:52:05 GMT 9.5
Hi there! Here is the image you can paste into your background in Blender. 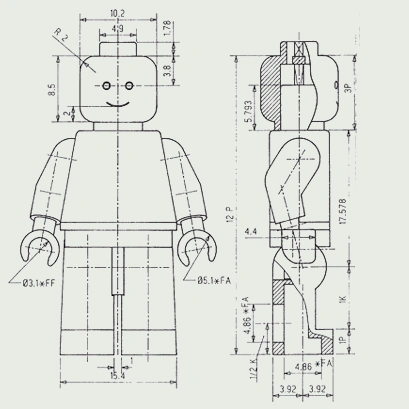 (Save this image somewhere on your computer) To paste this into the background on Blender, you will need to do a couple of things: 1. Open Blender and click 'File'. (Top Left) 2. Select 'User Preferences'. 3. Select 'Input'. 4. Find the checkbox that says 'Emulate Numpad' and tick this.  (Right click and select 'Open Link in New Tab' to open because it's really blurry) 5. Now close User Preferences and open the 'File' menu again. 6. Underneath 'User Preferences' click 'Save Startup File'. This means that Blender will keep your current settings every session so you don't have to change it every time. Now that you have that done, place your mouse inside the 3D Viewport and press the 'N' key. This opens a small tab on the side. Scroll down to the bottom and tick the checkbox that says 'Background Images'. Now open that tab and click 'Add Image'. Click the small folder icon and find the image you saved on your computer. Now you should have that image set as a background, however you wont see it in the 3D Viewport yet. You should have 'Emulate Numpad' checked in 'User Preferences' so now press the '5' key. This toggles between Orthographic View and User View. Background images are only viewable in Orthographic Views. Press the '1' key on your keyboard and this should take you to the front side of the object. You should now see the background image of the Lego Figure. This is a great starting point for modelling. Before you start modelling make sure you are in edit mode. (Tab Key to toggle) |
|
|
|
Post by Jack Stevens on Mar 24, 2016 12:48:06 GMT 9.5
Feel free to post in this thread if you want to ask me something!
Edit: Or the Hotkeys thread as well! |
|
Mr S
Administrator
I am the overlord tank
Posts: 36
Gamer Tag: Lucky-Jase
|
Post by Mr S on Mar 31, 2016 10:41:26 GMT 9.5
Can i please get an idea of how everyone is going for this 3D modelling competition? Did you manage to spend time on it over Easter? Jack ran through an awesome tutorial last Thursday which got a few of us started, but there are plenty of other tutorials available online. You are free to meet up at anytime to discuss the competition, it is just that Fridays is the formal catch up time. We will continue working on the project tomorrow lunchtime, but i recommend putting some more time in this weekend. You wont get good unless you put the time in. And trust me, the rewards of putting time in can be amazing! See these examples |
|
|
|
Post by Jack Stevens on Mar 31, 2016 11:01:13 GMT 9.5
Here is my current progress! I'm thinking of adding a friend of Benny's from the Lego Movie.  |
|
webo
New Member
 WebO is Here WebO will live
Posts: 6 
|
Post by webo on Apr 2, 2016 21:36:15 GMT 9.5
|
|
Mr S
Administrator
I am the overlord tank
Posts: 36
Gamer Tag: Lucky-Jase
|
Post by Mr S on Apr 7, 2016 9:31:17 GMT 9.5
I was working on my model last night, and was stuck on how to make the arm.
I used a cylinder, but how do you curve it for the elbow? And further, and from looking at other models, it doesnt appear to be straight. Any tips?
Also, did you do a UV map to texture it?
|
|
|
|
Post by Jack Stevens on Apr 7, 2016 9:37:32 GMT 9.5
Hi there!
To make the elbow bend like the one I did in my models, you just have to highlight the set of vertices where the bend is, extrude them and then rotate it using the R key. Once you've done that you can just extrude it again.
As for texturing, I did use UV maps but I marked a lot of 'seams' first. What these are is they tell Blender where to slice the mesh into different parts. For the arms I don't think I used any of these however as I just needed one colour the whole way down. The hand had one seam on it where it met the wrist just to keep that separate. If you still can't work it out I'll show you on Friday.
Good luck!
|
|
|
|
Post by Jack Stevens on Apr 7, 2016 10:38:53 GMT 9.5
Just so you get an idea of what a UV might look like, here is the current texture map for my Lego figures. Note that it doesn't include the hair and other accessories:  The top left is the head, you can see the unwrapped cylinder shape. The two circles at the top are the top and bottom of the head. Just under the face is the waist section, which is the part between the Figure's legs. To the right of that is the leg maps and beneath that, where the circles are is the arms. The whole bottom left section is the body. The way I texture this is I go into Photoshop and duplicate the layer. I then edit the bottom layer by painting over it so that I can still see the mesh. When I want to put the face in I find or create an image and paste it on the face section in the top left. For Benny, the space guy, I had to find a Logo and paste it onto his shirt. I realised afterwards that this layout was a bit silly as I would have to flip everything I wanted on the front of the shirt upside down. When I create my next mesh I will probably arrange a better layout but you get the general idea. If you would like me to show you how to texture, ask me during a Friday session. |
|